Getting started with Docker.
The tool every tech enthusiast should have in his toolbox.
By Prajwal Basnet | Nov 5 2022 | 7 minute read
INTRODUCTION
Docker is a container technology that utilizes the Os host kernel to separate applications from infrastructure (hardware). It is similar to a Virtual machine separating Operating System from the underlying hardware, but Instead of the fat requirements of a virtual machine, Docker is lightweight, and portable - as it contains only essential dependencies (not an entirely new O.S).
Why Docker ?
The key benefits of using Docker are the standardized packaging and deployment of applications across all environments. Additionally, we don't have to install every application dependency on our machine if we utilize Docker. For instance, let's say you are planning to learn programming language, you can create container( say an ubuntu image) and code in that container by mounting docker data to local storage with vim instead of coding in your host Operating system. Then, you can push that container to docker hub which will let you pull that container remotely.

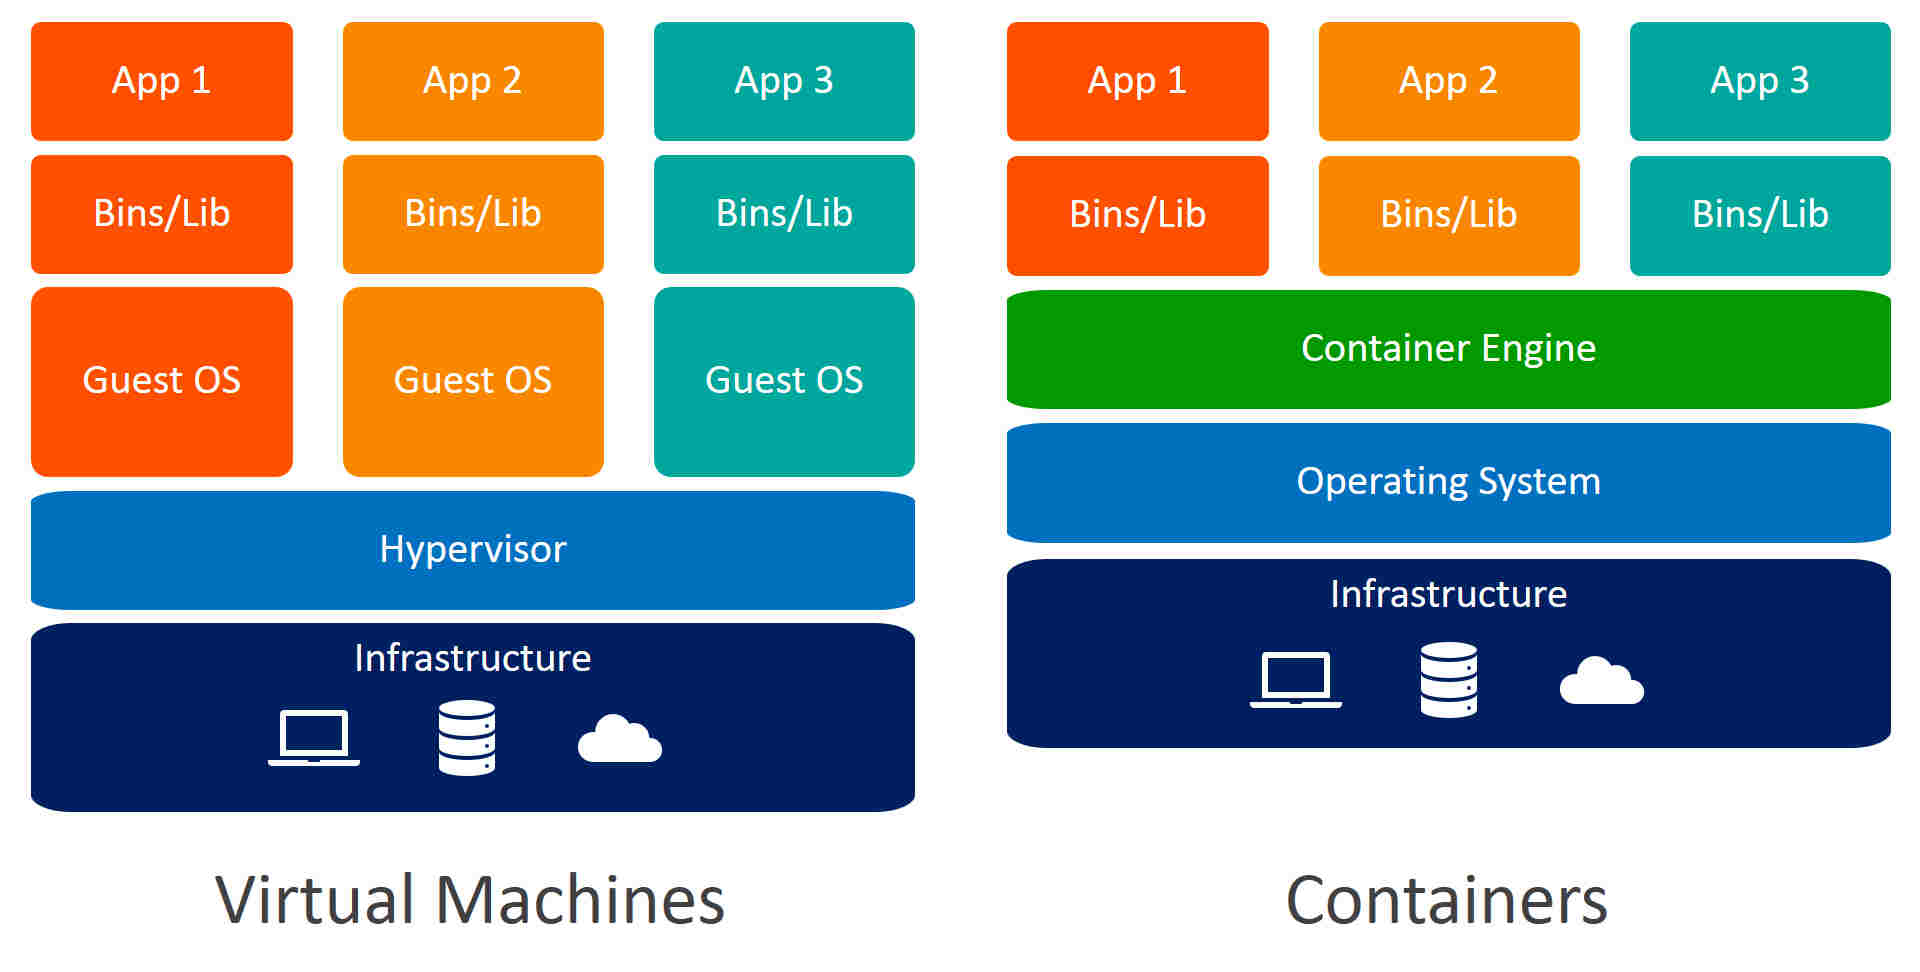
Difference between Virtualization and Containerzation
Before understanding the difference between virtual machines and Docker, first, we need to understand the technologies behind them. Virtual machine use Virtualization meanwhile, Docker use Containerization.
Virtualization is a process of creating a completely new operating system (Virtual machine) on top of the host operating system (underlying machine) with the help of software called - hypervisor.
Meanwhile, Containerization is a process of creating operating system level virtualization - as it runs on the same O.S as the host - with the help of a container engine (or, in plain English, process that is responsible for packaging and deploying application).
Components of Docker
Docker engine comprises the docker daemon (server), Rest api, and docker Cli.
Docker daemon: A system service or process thats create docker images as well as namespaces and cgroups for containers. It uses APIs to accomplish its functionality.
Rest Api : It deals with interation of application.
Docker Cli : Allows user to make commands to docker daemon, such as running and stopping containers, removing images etc.
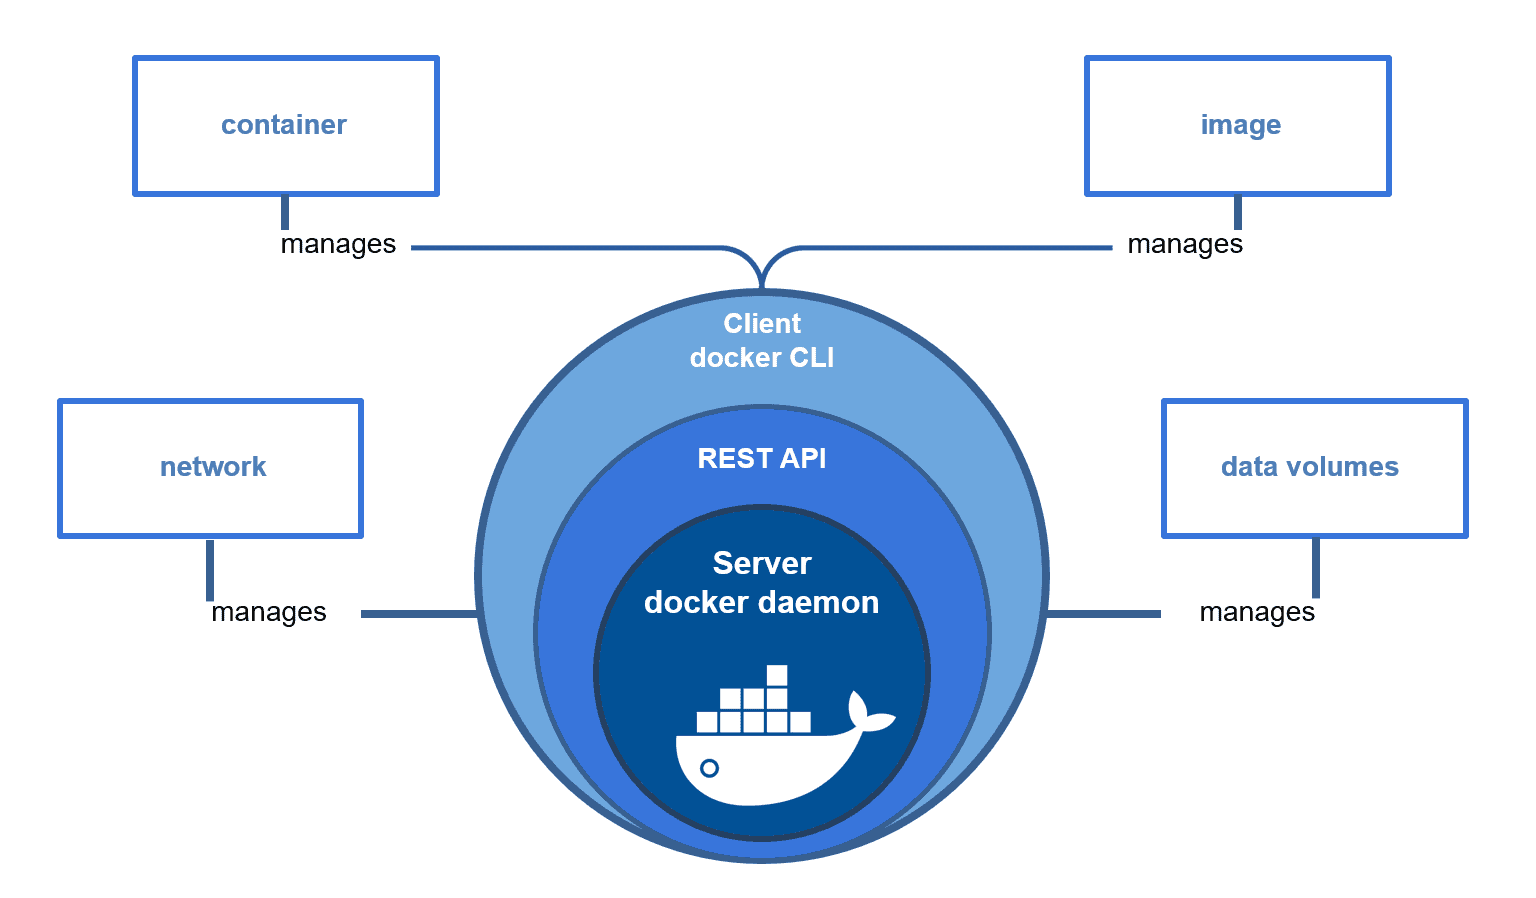
Docker Registry
It is a place where images are stored, and the official place to store images is DockerHub. We can push(upload) and pull(download) our images to DockerHub to make them accessible from anywhere. For git, it is comparable to github.
Docker Images and Containers
Docker image is a file that comprises everything needed to run an application which includes dependencies, environment variables, configuration files etc. we can create our own image and make as much container as we like.
Docker container is a instance (children) of a image. It is a environment where we interact and where our application runs.
Now, let us try to understand image and container with an analogy: Containers are like a cookies you make and Images are the recipe for making your cookies. A recipe can be used to make as much cookies as your resources allow. Similarly, an image is used to make as much container as your recourse allow.
Docker Installation
For Debian based O.S :
Update your package manager :
Sudo apt-get update
Then, Install Docker :
Sudo apt-get install docker.io
Now, Check whether Docker is properly installed :
Docker version
Docker Essentials
Now that we've learned some fundamentals, let's get tangible and functional.
Before building our own image file, let's first learn by installing official Ubuntu images from Dockerhub.
Docker pull UBUNTU : To simply pull images.
Docker run UBUNTU : it will first try to install image from local environment, if it is not there then it will install from Dockerhub.
By default, Docker doesn't have terminal so it runs on non interactive mode. Thus, inorder to listen inputs you need to specify -it flags - where I stands for interactive and t stands for pseudo terminal.
Docker run -it --name DOCKERNAME UBUNTU : it will provide interactive mode and name image name as DOCKERNAME.
To stop the container, write exit in docker terminal.
Basic Docker commands
Docker images : to list images
Docker rmi images : to remove image
Docker ps : to list running containers.
Docker ps -a : to list both running and stopped containers.
Docker rm container : to remove container
Docker start container : to start stopped container
Docker stop container : to stop a running container.
Docker inspect container/image : to inspect image or container.
Once you exited from docker terminal, you may again want to start from where you have exited.
Docker exec -it container /bin/bash : start interactive mode to stopped container.
docker exec container cat /etc/hosts : to execute command from container without interactive terminal
docker run -d --it ubuntu : to detach container
docker logs container : to see container log history.
docker cp /hostfile (container_id):/(to_the_place_you_want_the_file_to_be) : move files from host to docker.
Port Mapping
docker run -p 80 (local computer port):5000(docker port) UBUNTU : this will map port 80 to 5000 port.
Volume Mapping
When we delete the container, all our data is also deleted which might be frustrating if we haven't backed up. Therefore, Docker provides volume mapping options which enable us to presist data - even if container is deleted - by storing in external volume.
There are two way to mount data :
- - volume mounting
- - bind mounting
Volume Mounting:
In volume mounting, data is stored in default location( /var/lib/dockers/volumes). We can create volume with following command below, even if we didn't create volume docker will automatically create one for you.
docker create volume volume_1 : to create storage name volume_1
docker run -v volume_1:storagepath UBUNTU : store data in /var/lib/docker/volumes/volume_1 On your pc
or
docker run -v /data UBUNTU : store data from docker (/data) to default location
Bind mounting:
The key difference is bind mounting can mount data to any location unlike volume mounting - which mounts on /var/lib/docker/volumes.
docker run -v /opt/dockerdata (or any path on your pc) :/var/lib/database (docker data path) : this will backup docker database into /opt/dockerdata.
I would highly recommend you to read this Blog.
Environment variable
To set an environment variable to your image, use -e flag as shown below:
docker run -e USER_NAME=STAINEE UBUNTU : sets environment variable.
Networking In Docker
Docker uses a bridge network by default, which will assign an IP address to each container. Let's take an example where the image has three containers and an IP address of 172.17.0.1. Then, each container will receive an IP address starting with 172.17.0.2 .
We can also map Docker network to the host network. That means if port 80 is opened on a local machine, docker will automatically open port 80 without using port mapping manually. We need to use flag below when running the image.
--network=host
And to isolate the container completely we use the following flag below:
--network=none
Creating Our Own Docker Image
We have learned almost all essentials commands in docker. Now, It is time to create our own image. To create our own image, we need Dockerfile - name needs to be exactly same - where we write instructions to setting up our image.
Once we have set up all the instruction in Dockerfile, we need to build your image on our system.
Dockerfile sample
                FROM Ubuntu:20.04
                RUN apt-get update && apt install vim
                COPY . /docker
                WORKDIR /docker
docker build -t image_name:tag_name dockerfile : to build command by specifying tag which is similar to your id.
After building image locally, we can push our image on dockerhub to acess our image remotely.
docker push username/repo:image_tag : to push image on dockerhub.
if you made changes to container, you can commit changes and push image again:
docker commit container_id username/image_name : to modify image
Conclusion
In the end, Docker is a tool for building, managing and containerization of application. In this blog, we have covered quite a bit of docker core functionality. For more advance concept (or to cement your understanding), I advise everyone reading this to checkout the reference below. I hope you keep this tool in your toolbox - especially if you are into devops or software developing.
REFERENCE
- https://kodekloud.com/p/docker-labs
- CodeCamp.org - youtube tutorial
- Official docker documentation
- blog.devgenius.io
- blog.yipl.com